Showing posts with label Quilt Top. Show all posts

Wednesday, August 28, 2013

Nearly... there.....

So, I've been really busy again this week - not necessarily quilting though (unfortunately).  I did get a few more blocks done for my Craftsy (2012) BOM series.  I'm definitely liking my choices of fabric more and more as I continue.

ConstrucingDresden

Dresden

No matter what I tried, I could not get the white background fabric to show as white. Probably because I took it on my blue cutting mat (as I do with so many other things), and that is shining through the Kona Snow... oh well. Still not bad for my first Dresden ever.

Ohio Star

Double Star

I'm still not completely satisfied with the points on this one.

Circle of Geese Quarter Block

Lastly, my in progress circle of geese block. I should finish this one in the next hour, and hopefully the remainder of the blocks today or tomorrow (there are only 4 left!)

Lastly, be sure and come back tomorrow for Tutorial Thursdays!  It's a link party where I'm sharing a tutorial, and asking you to do the same. :)

Sew Simply

Friday, August 23, 2013

First HEX experience

I'm so excited that I finally decided to do my hexie blocks.  The first one is finished and it came out very pretty, I think. I decided to make my own hexie templates from the one that was in the class materials on the Craftsy class.

Templates

I was afraid the regular printer paper was going to be too flimsy, but it worked out okay.  I'm glad I cut the template out of a cardboard piece I snagged from a FQ, now I'll have it to make more paper pieces later.

Cut

I stitched them all together last night while my husband and I watched a movie.  Not many pictures occurred during this time.  :)

Pins

I can't say how much I love those little flat flower pins.

Finished Hex Block

I machine appliqued my hexie stripe on with a zig-zag pattern.  Warm with one cool hex.  So, that block is finished - now I'm going to hope for my local quilting shop to carry more kona snow fabric so I can finish the rest of the series.. I wish the fabric fairy would bring me some solids!!

Studio Update! 

So, for a while, my studio has been a wreck.  Between all the home repairs and updates my husband and I are doing to our 103 year old house, my studio has become kind of a storage room.  Today, I got a bit of drive to clean up my fabric stash, and finally put it in its place - the awesome built in shelving unit in my studio. I was so excited because there is room in there to grow!

I wish that I had taken a before picture - my painting supplies were all over both the shelves, and it was generally a huge wreck.  I think as a general rule, there is never enough storage space, no matter where you live.  Don't you agree?

Storage

So, I'm calling both of these things my finishes for the week, baby steps, you know!

Linking up with Crazy Mom Quilts for Finish it up Friday
And Thank Goodness it's Finished Friday this week at Sewing By Moonlight.

Thanks for reading, lovelies.
Cassie

Thursday, August 22, 2013

Tutorial Thursdays!

Grab a badge for your blog here:
Sew Simply


So, this week I've been kind of lazy.  My husband and I started watching Breaking Bad (from the beginning), and that has distracted me - so I've only been working on the Craftsy BOM from 2012.  I blogged about it yesterday, in fact!

I have to say that Craftsy's BOM class - for the sake of Tutorial Thursdays, we'll call it a tutorial "series" - has been very good so far.  I have not really learned a new technique, but it has been good practice, and I've been forced to kind of think about color matching as I go along, rather than just having all the fabric for the entire project laid out at the start (I went with the stash rather than purchasing a new bundle..)


That being said, I'm NOT going to actually post the tutorial, since I can't.  You have to register on Craftsy to actually take any of their classes (it's free to register).  However, I will post my finished broken spider web block :)

Finished Broken Spider Web

I just hate that my final point was off by like 1/8 of an inch.... I might unpick some of the stitches and try to fudge it a little.  I haven't decided yet - have any of you had any success with doing that?  Yes, it is a string block, so none of the seams are supposed to match other than around the center star. 

Hopefully next week I'll have a better tutorial for y'all.  Until then, share what you've been working on from a tutorial (or your own tutorial)! 

Thanks for reading! 
Cassie


Wednesday, August 21, 2013

Block Progress

My A.D.D. self has started another project.  Last week (I think), I blogged about wanting to start the Craftsy BOM series from 2012.  I just loved Amy Gibson's choice of blocks, so I told myself, "you can make one block a day, and that's that."  - Plus I just so happened to have a few yards of Kona Snow, the fabric she chose as her background fabric, so I took that as a sign.

Anyway, I wanted to share with you my progress so far.  I've got 7 blocks completely done, and one 3/4 done - my husband wanted to call it early last night so we could go for a run this morning... out of respect for the light sleeper, I turned off the sewing machine.

Here's what I've made so far on this project:

January Blocks
Asterisk
The Asterisk Block

WonkyPoundSign
Slashed Pound Sign

February Blocks
Balkan Puzzle
The Balkan Puzzle - this one has been one of my faves so far :)

Chunky Chevron
Chunky Chevron

March Blocks
string block
String Block

Broken Spider Web
The IN-PROGRESS Broken Spider Web

April Blocks
These are hexie blocks which I haven't done because, frankly, my printer is out of ink!

May Blocks
Modern Frame Log Cabin
Modern Frame Log Cabin - I really enjoyed the improv blocks.. I'm thinking about making an entire quilt of either a May block or something from March... but that's in the future.

5-sided wonky log cabin
5-sided Wonky Log Cabin

Well, that's about all for now! Finishing up the Broken Spider Web block today, and going to go pick up ink for the printer so I can do my hexie blocks.

Linking up with WIP Wednesdays @ Freshly Pieced


Thursday, August 8, 2013

Tutorial Thursdays - WEEK 1

So, I got a novel idea today. There are all these great tutorials that people do - I want to know what you guys are working on. As a fairly new face to the sewing/quilting game, I realize that I might be recreating the wheel here. There are tons of compilation blogs of tutorials (i.e. Moda Bake Shop, etc.), but I want to see your work.

Here is my promise: every week (after this one - because, of course, I only thought of this after Thursday started!) I'll post a linkup that starts at 12:00 am CST, and ends at 11:55 pm CST.

The only rules are: you must comment on the few links before your own, and to have fun. Of course, copyright stuff should be honored and credit should be given where they're due.

Here's what you can post: If you have your own tutorial that you made for your readers, you can post it in my weekly link-up: Tutorial Thursdays. If you are working on someone else's tutorial, you can link up a post on your progress. Just be sure to give the original author of the tutorial credit!

So, to kick things off: I'll post a link to a tutorial that I'm working on - I don't think that I'm skilled enough to create my own tutorial yet.
This is Anchors Aweigh by Tula Pink. I am creating it for my little brother who is about to end his time in the US Coast Guard.  I talked about in a previous post that I got my hands on a few of his old uniforms, and I'll be incorporating those into the quilt.  The anchor will be shades of blue...
 Squares
Here are the squares... ALL of the squares.  The darkest blue (fabric B) squares are cut from his uniforms.

Since his uniforms have all these embellishments:
I really want to incorporate those as well..  Please leave me any suggestions you have for incorporating those in the comments below.  I have about 5 uniform shirts which have all of the above embellishments.
 
Lastly, since it's to honor military service, I plan to use red and white solids as the negative space fabrics.  

Honestly, after it's done, I might just keep it for myself.  ;-) Or make another in Tula Pink's fabrics that it was designed for!  I just need to get my hands on them. 

Thanks for reading!  
Cassie

Okay, so here's my favorite part: show me what you're working on!!

Thursday, July 25, 2013

Stash started!

I have been really fortunate in my sewing escapades so far.  I got a huge old Hon desk from freecycle.org which is large enough to host my cutting mat and my sewing machine, plus it has tons of storage for whatever.  As the name suggests, the desk was free!  I just had to pick it up.  Then the husband and I had to maneuverer  it into my art studio/craft room.

My mom has been accumulating a fat stash of fabric for quite some time.  I had no idea how much she actually had in her craft room.  I had been talking to her a lot about sewing, post catching the sewing bug - she seemed mildly interested, but humored me by listening as I gushed about being so happy that I'm finally getting the hang of the techniques and the latest idea I had for a project. 

She and my dad happened to be around town a few weeks ago, so I made the hour trip to visit them.  To my surprise, she shared her stash with me.  No, literally, she halved every piece of fabric that she had and gave me half of her stash.  When I got home and asked my husband to help me bring it all in from the car, he gave me this accusing look like I had spent a fortune.  When I told him it was from my mom, he looked relieved. 

So, here are a few pictures of the "stash" I got from my mom, combined with what little I had leftover from my Victorian Modern QAL (found here). 


For someone who has only been "collecting" for a month or so, I don't think my stash is too shabby!
 
Now for another project I'm working on: 
 
I found this tutorial in the Moda Bake Shop.  Baby Lattice Tutorial
 
My mom gave me some super cute flannel for a baby boy.  My sister-in-law is pregnant with her first baby (and my first nephew!), so like any loving aunt, I'm going to make plenty of goodies for him.  :)  I pored over hundreds of baby quilt designs, both free, and paid.  Of course, after my experience with the first quilt top I made, and the crooked corners, I wanted to find a more forgiving design.  This one was perfect!  And it was free. (Thanks Moda Bakes Shop!!)
 
So I made the quilt top out of these fabrics:  
 
I had to devise a sort of design wall for this project, since it called for a bunch of littler squares that were random in placement.  So I put up a piece of batting (next time I will use all cotton or fleece, I think) on the wall to figure out my placement of the blocks and start piecing them together. 
 
The piecing was definitely a breeze without the guesswork of where each piece belongs.  I was able to complete the entire quilt top in a few hours (not sure if that's good or bad - I'm a newbie (: )
 
Here is a picture of the top completed.  (Sorry, it's basted in this picture, going to take a stab at quilting this afternoon!) 
 

I also did something a little creative with the back.  Since we live in Texas, and it's a thousand degrees here, I made a cotton back for the quilt, so it can be used year-round.  This picture is also of the back post-basting.. sorry again.  You get the picture though.   
 
The fabrics I used for the back were a yellow and white striped and a random baby footprint fabric.  I think post-quilting, the back will be nice.  I was picturing something much cuter in my head.
 
Anyway, this is how this one stands right now - I'll post (hopefully better) pictures of the finished product once it's done. 

I think I missed my calling

Over the past month or so, I have been sew crazy. I picked up my first sewing machine - a Janome 7330 Magnolia - from Wait's Sewing in Tyler, TX last year, but barely used it, as I was a work-a-holic. (He doesn't have a website, but his YP entry can be found here)

As a stroke of good fortune, I have had the opportunity to spend much of my time lately in front of the machine. My husband wasn't thrilled about it at first, but then he started to see how happy it made me to create something beautiful out of a few scraps of fabric and time. (Plus his grandmother does a lot of quilting, and I think he's hoping that I can eventually create the beauties that she does - I hope so too!)

  Right now, I don't think it's anything more than just a hobby, but I would eventually love to do some design work - maybe put my painting skill to the test and come up with a fabric design. (How do you even get something like that started??)

Let me show you what I've been working on so far!

I have never been shy about jumping right in there and trying something new. So I started Googling and YouTubing quilting tutorials. (After all, sewing a quilt top must be easier than garment sewing....) I came across Crafty Gemini's blog and YouTube Channel. She had just started her Victorian Modern Quilt-Along. You can find her Victorian Modern QAL here.

...I decided to give it a go. This is what happened:


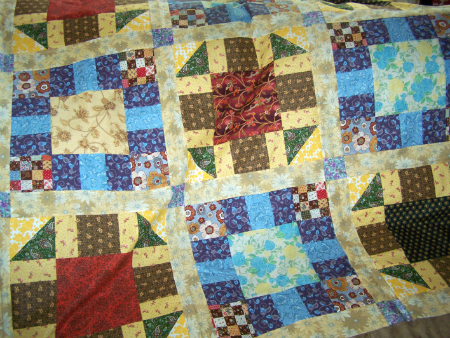
There are a few things I learned while putting together this quilt top:
  1. Be careful when picking replacement fabrics if you don't want to use the ones from the tutorial/pattern/quilt along. I found that my fabric selections didn't really have the same "feel" as the original that Vanessa made. Anyway, there are only a few fabrics that I used that, in retrospect, I would have selected a different fabric instead. Namely, the green and corners on all the blocks, and the sashing strips. Other than that, I don't feel that I did such an awful job choosing fabrics for my first project.
  2. Corners are not easy if you're careless with measurements and seam allowances.  A little here and there can really add up to the end result being off by quite a bit.  


Long story short: I started paying a lot closer attention to my seam allowances.  I still don't have a 1/4" piecing foot, but I did attach a little stack of sticky notes as a guide on my machine. That definitely helped - A LOT.


So that this post does not get too long, I will share my other projects in a future one.  Thanks for reading!

Special thanks to Vanessa, the Crafty Gemini - she came up with the design for the quilt featured in this post.  Here is a link to her blog: Crafty Gemini.