Showing posts with label Creative Quilt Back. Show all posts

Friday, August 30, 2013

Nook HD Cover {Tutorial Coming NEXT THURSDAY!}

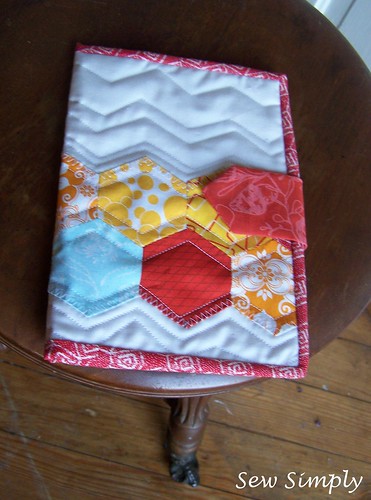
Finished Cover

This week I finished this - a great quilted Nook HD cover. I stole my hexie stripe block from my Craftsy BOM 2012 to make it, so now I have to make another - oh darn!

I have some exciting news: next week for Tutorial Thursdays, I'm going to teach you how to make this cover for any electronic device you might have. :D I'm in the process of writing the tutorial now.

Grab my Tutorial Thursdays Button here:
Sew Simply

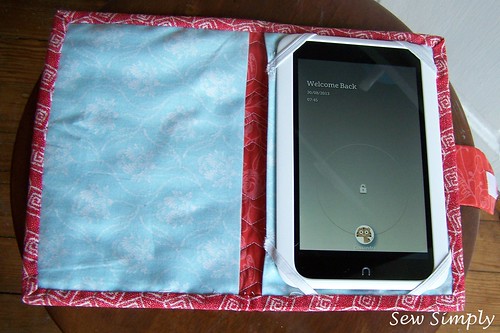
Finished Cover 2
Thanks for reading!
Cassie

Linking up with Crazy Mom Quilts for finish it up Friday!

Friday, July 26, 2013

Machine binding and the finished baby quilt

I did it!  I finally finished a whole quilt all by myself!  While it's not perfect, it is done.  I did not expect perfect for my first quilt, anyway. 

Here are links to a few things that helped me:

Machine binding tutorial at Cluck Cluck Sew
Tutorial for Baby Lattice Quilt Top

I also watched a free class on Craftsy from Elizabeth Hartman on creative quilt backs.  :)

Lessons learned: don't machine quilt without the right presser foot.  I'm both too broke, and unsure of where to buy the right foot.  I'm uneasy buying one online because I can't find one that has my machine's model number specifically listed.  So, until I can catch Wait's open, and I have the money for the walking foot, and darning/free-motion (still don't think I have the guts for that..), it looks like I'll be trying my hand at hand-quilting for the next one.  I'll show you why in a minute... 

The machine quilting/binding process I went through -

Quilting:

I decided to grid my quilt top.  Using the regular straight stitch presser foot both cause bubbling in my fabric when stitches crossed and it caused a lot of shifting in the quilt top.
So before I machine quilt another quilt, I'll be getting the proper equipment.  Other than that... it wasn't bad!

Binding:

I am so not used to taking pictures during any of my processes.. but I did manage to remember to take a few. :)  If you want to know where I got the original tutorial that I read for machine binding it can be found here.

First, I started with the typical strips of fabric used for binding.  I needed 5 strips joined to complete my quilt.   I chose to use the same baby footprint fabric that is featured on my quilt back in the pieced strips and squares. 

After squaring my quilt and trimming the excess back/batting, I pinned my binding strips to the edge and took it to my machine. 
I was a little nervous about going over or under on my seam allowance on this.  Though in hindsight, I shouldn't have been.  I had plenty of room once I turned my binding to the back.  I'll show you what I mean:
The stitch line on the top is after binding the back of the quilt.  There's a good 1/4" - 3/8" difference there.  Granted, this was my first corner, and I did improve as I went on, but still, good to know :)

Anyway, back to the process:

As you continue binding on the front side of the quilt and approach a corner, simply stitch to right before the end, and turn your fabric, as shown:
Start stitching at the very end again.  I did a couple back-stitches since I know baby quilts go through the wash quite a bit. 

After you finish binding the front turn the binding to the back and pin in place, especially around the mitered corners. :)

The tutorial says to stitch the back just to the left of the original stitch showing on the back from the front side.  Since I don't have a walking foot, and I was fighting to keep everything lined up and feeding through my machine properly, I didn't manage this so well at the start.  Again, after I got the feel for it, I improved. 

Anyway, here are a few pictures of the finished baby quilt:

Full Quilt Top
 
Back detail and front corner turned.
Front detail and back corner turned.
Final dimensions are 45" x 37"

Thanks for reading!

Linking up with Crazy Mom Quilts for finish it up Friday!  Hope to have another next week :)

- Cassie


Thursday, July 25, 2013

Stash started!

I have been really fortunate in my sewing escapades so far.  I got a huge old Hon desk from freecycle.org which is large enough to host my cutting mat and my sewing machine, plus it has tons of storage for whatever.  As the name suggests, the desk was free!  I just had to pick it up.  Then the husband and I had to maneuverer  it into my art studio/craft room.

My mom has been accumulating a fat stash of fabric for quite some time.  I had no idea how much she actually had in her craft room.  I had been talking to her a lot about sewing, post catching the sewing bug - she seemed mildly interested, but humored me by listening as I gushed about being so happy that I'm finally getting the hang of the techniques and the latest idea I had for a project. 

She and my dad happened to be around town a few weeks ago, so I made the hour trip to visit them.  To my surprise, she shared her stash with me.  No, literally, she halved every piece of fabric that she had and gave me half of her stash.  When I got home and asked my husband to help me bring it all in from the car, he gave me this accusing look like I had spent a fortune.  When I told him it was from my mom, he looked relieved. 

So, here are a few pictures of the "stash" I got from my mom, combined with what little I had leftover from my Victorian Modern QAL (found here). 


For someone who has only been "collecting" for a month or so, I don't think my stash is too shabby!
 
Now for another project I'm working on: 
 
I found this tutorial in the Moda Bake Shop.  Baby Lattice Tutorial
 
My mom gave me some super cute flannel for a baby boy.  My sister-in-law is pregnant with her first baby (and my first nephew!), so like any loving aunt, I'm going to make plenty of goodies for him.  :)  I pored over hundreds of baby quilt designs, both free, and paid.  Of course, after my experience with the first quilt top I made, and the crooked corners, I wanted to find a more forgiving design.  This one was perfect!  And it was free. (Thanks Moda Bakes Shop!!)
 
So I made the quilt top out of these fabrics:  
 
I had to devise a sort of design wall for this project, since it called for a bunch of littler squares that were random in placement.  So I put up a piece of batting (next time I will use all cotton or fleece, I think) on the wall to figure out my placement of the blocks and start piecing them together. 
 
The piecing was definitely a breeze without the guesswork of where each piece belongs.  I was able to complete the entire quilt top in a few hours (not sure if that's good or bad - I'm a newbie (: )
 
Here is a picture of the top completed.  (Sorry, it's basted in this picture, going to take a stab at quilting this afternoon!) 
 

I also did something a little creative with the back.  Since we live in Texas, and it's a thousand degrees here, I made a cotton back for the quilt, so it can be used year-round.  This picture is also of the back post-basting.. sorry again.  You get the picture though.   
 
The fabrics I used for the back were a yellow and white striped and a random baby footprint fabric.  I think post-quilting, the back will be nice.  I was picturing something much cuter in my head.
 
Anyway, this is how this one stands right now - I'll post (hopefully better) pictures of the finished product once it's done.