Showing posts with label Design. Show all posts

Sunday, July 28, 2013

Birthday Celebrations!

Yesterday was my birthday party.  It was fun! 

My friend Deisi and I stayed in the studio late last night and painted.  She painted a deserted zombie town and I finished a painting for a job - a friend of mine wanted it to hang in her massage studio.  So, for a day, I took a break from the sewing machine and went back to my roots as a painter with a good friend. 

Here are our paintings :)

Deisi's Deserted Zombie Town
My Cherry Blossoms Painting
 
While I didn't sew a single thing yesterday, my mom gave me my birthday present when I saw her, a travel sewing machine case and a thread spool rack.  I was so excited!  I also got to show her my baby quilt.  She was impressed. 
 
That's all for now, I think I'll be spending some time with my machine tonight.  

Thursday, July 25, 2013

Stash started!

I have been really fortunate in my sewing escapades so far.  I got a huge old Hon desk from freecycle.org which is large enough to host my cutting mat and my sewing machine, plus it has tons of storage for whatever.  As the name suggests, the desk was free!  I just had to pick it up.  Then the husband and I had to maneuverer  it into my art studio/craft room.

My mom has been accumulating a fat stash of fabric for quite some time.  I had no idea how much she actually had in her craft room.  I had been talking to her a lot about sewing, post catching the sewing bug - she seemed mildly interested, but humored me by listening as I gushed about being so happy that I'm finally getting the hang of the techniques and the latest idea I had for a project. 

She and my dad happened to be around town a few weeks ago, so I made the hour trip to visit them.  To my surprise, she shared her stash with me.  No, literally, she halved every piece of fabric that she had and gave me half of her stash.  When I got home and asked my husband to help me bring it all in from the car, he gave me this accusing look like I had spent a fortune.  When I told him it was from my mom, he looked relieved. 

So, here are a few pictures of the "stash" I got from my mom, combined with what little I had leftover from my Victorian Modern QAL (found here). 


For someone who has only been "collecting" for a month or so, I don't think my stash is too shabby!
 
Now for another project I'm working on: 
 
I found this tutorial in the Moda Bake Shop.  Baby Lattice Tutorial
 
My mom gave me some super cute flannel for a baby boy.  My sister-in-law is pregnant with her first baby (and my first nephew!), so like any loving aunt, I'm going to make plenty of goodies for him.  :)  I pored over hundreds of baby quilt designs, both free, and paid.  Of course, after my experience with the first quilt top I made, and the crooked corners, I wanted to find a more forgiving design.  This one was perfect!  And it was free. (Thanks Moda Bakes Shop!!)
 
So I made the quilt top out of these fabrics:  
 
I had to devise a sort of design wall for this project, since it called for a bunch of littler squares that were random in placement.  So I put up a piece of batting (next time I will use all cotton or fleece, I think) on the wall to figure out my placement of the blocks and start piecing them together. 
 
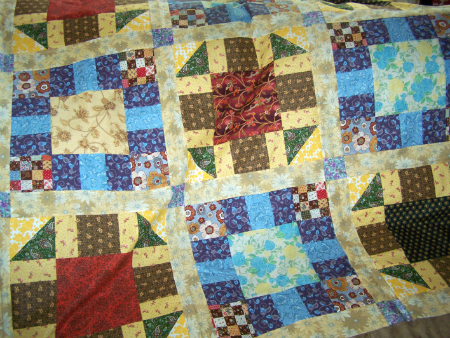
The piecing was definitely a breeze without the guesswork of where each piece belongs.  I was able to complete the entire quilt top in a few hours (not sure if that's good or bad - I'm a newbie (: )
 
Here is a picture of the top completed.  (Sorry, it's basted in this picture, going to take a stab at quilting this afternoon!) 
 

I also did something a little creative with the back.  Since we live in Texas, and it's a thousand degrees here, I made a cotton back for the quilt, so it can be used year-round.  This picture is also of the back post-basting.. sorry again.  You get the picture though.   
 
The fabrics I used for the back were a yellow and white striped and a random baby footprint fabric.  I think post-quilting, the back will be nice.  I was picturing something much cuter in my head.
 
Anyway, this is how this one stands right now - I'll post (hopefully better) pictures of the finished product once it's done. 

I think I missed my calling

Over the past month or so, I have been sew crazy. I picked up my first sewing machine - a Janome 7330 Magnolia - from Wait's Sewing in Tyler, TX last year, but barely used it, as I was a work-a-holic. (He doesn't have a website, but his YP entry can be found here)

As a stroke of good fortune, I have had the opportunity to spend much of my time lately in front of the machine. My husband wasn't thrilled about it at first, but then he started to see how happy it made me to create something beautiful out of a few scraps of fabric and time. (Plus his grandmother does a lot of quilting, and I think he's hoping that I can eventually create the beauties that she does - I hope so too!)

  Right now, I don't think it's anything more than just a hobby, but I would eventually love to do some design work - maybe put my painting skill to the test and come up with a fabric design. (How do you even get something like that started??)

Let me show you what I've been working on so far!

I have never been shy about jumping right in there and trying something new. So I started Googling and YouTubing quilting tutorials. (After all, sewing a quilt top must be easier than garment sewing....) I came across Crafty Gemini's blog and YouTube Channel. She had just started her Victorian Modern Quilt-Along. You can find her Victorian Modern QAL here.

...I decided to give it a go. This is what happened:


There are a few things I learned while putting together this quilt top:
  1. Be careful when picking replacement fabrics if you don't want to use the ones from the tutorial/pattern/quilt along. I found that my fabric selections didn't really have the same "feel" as the original that Vanessa made. Anyway, there are only a few fabrics that I used that, in retrospect, I would have selected a different fabric instead. Namely, the green and corners on all the blocks, and the sashing strips. Other than that, I don't feel that I did such an awful job choosing fabrics for my first project.
  2. Corners are not easy if you're careless with measurements and seam allowances.  A little here and there can really add up to the end result being off by quite a bit.  


Long story short: I started paying a lot closer attention to my seam allowances.  I still don't have a 1/4" piecing foot, but I did attach a little stack of sticky notes as a guide on my machine. That definitely helped - A LOT.


So that this post does not get too long, I will share my other projects in a future one.  Thanks for reading!

Special thanks to Vanessa, the Crafty Gemini - she came up with the design for the quilt featured in this post.  Here is a link to her blog: Crafty Gemini.